Deploy ERC-721 Smart Contract
How to deploy ERC-721 smart contract to Polygon Mainnet
This blog post provides a comprehensive guide on creating ERC-721 tokens (NFTs) on Polygon, a leading Ethereum layer 2 scaling platform, through a simple and straightforward process.
Within this tutorial, you will gain insight into writing and deploying an ERC-721 smart contract on the Polygon mainnet by leveraging the following tools:
- MetaMask for wallet integration.
- Solidity as the programming language of choice.
- Hardhat as the development environment.
- Alchemy for blockchain infrastructure.
- OpenZeppelin Contracts for reliable and audited smart contract templates.
Step 1. Develop the ERC-721 Smart Contract
Develop the ERC-721 Smart Contract Using the OpenZeppelin Contract Wizard
To ensure the security and reliability of your ERC-721 smart contract, we will utilize the Open Zeppelin Contract Wizard. OpenZeppelin is a trusted organization known for maintaining secure, standard smart contracts like ERC20 and ERC721.
With the wizard, you can quickly create an ERC-721 smart contract that adheres to best practices and industry standards. This allows for compatibility and seamless integration within the blockchain ecosystem.
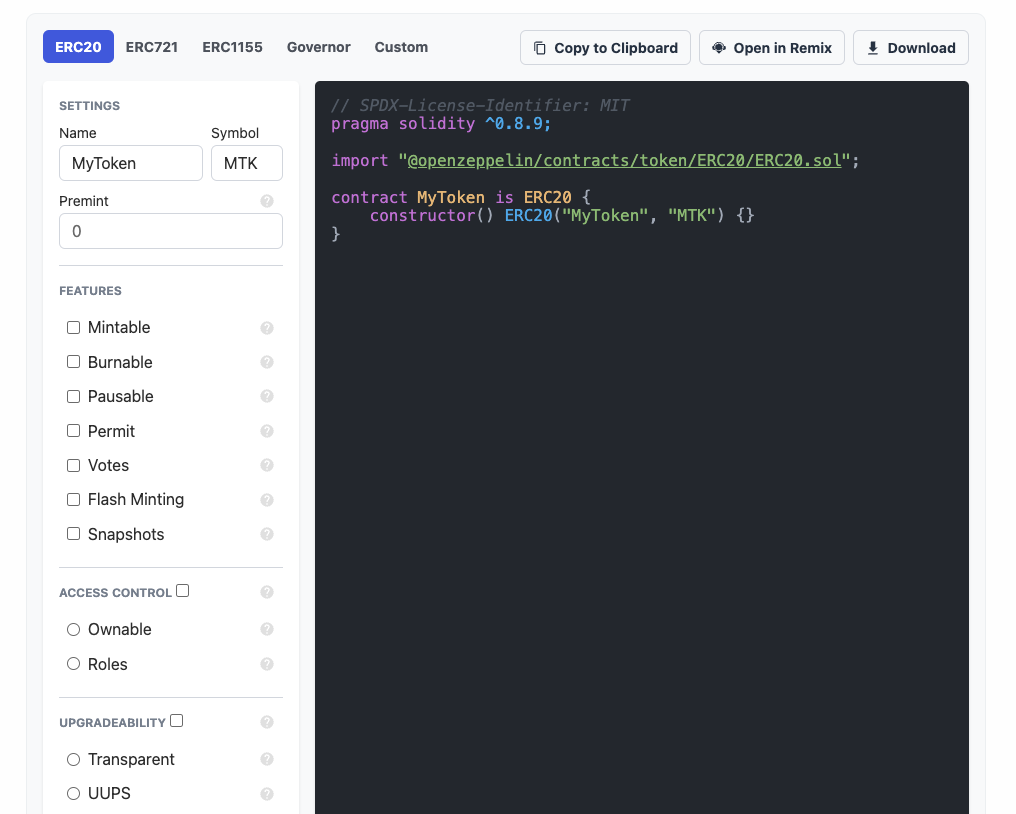
Go to the Open Zeppelin Smart contract wizard to get started developing our ERC721 NFT smart contract.
You will see the following editor once you reach the page:
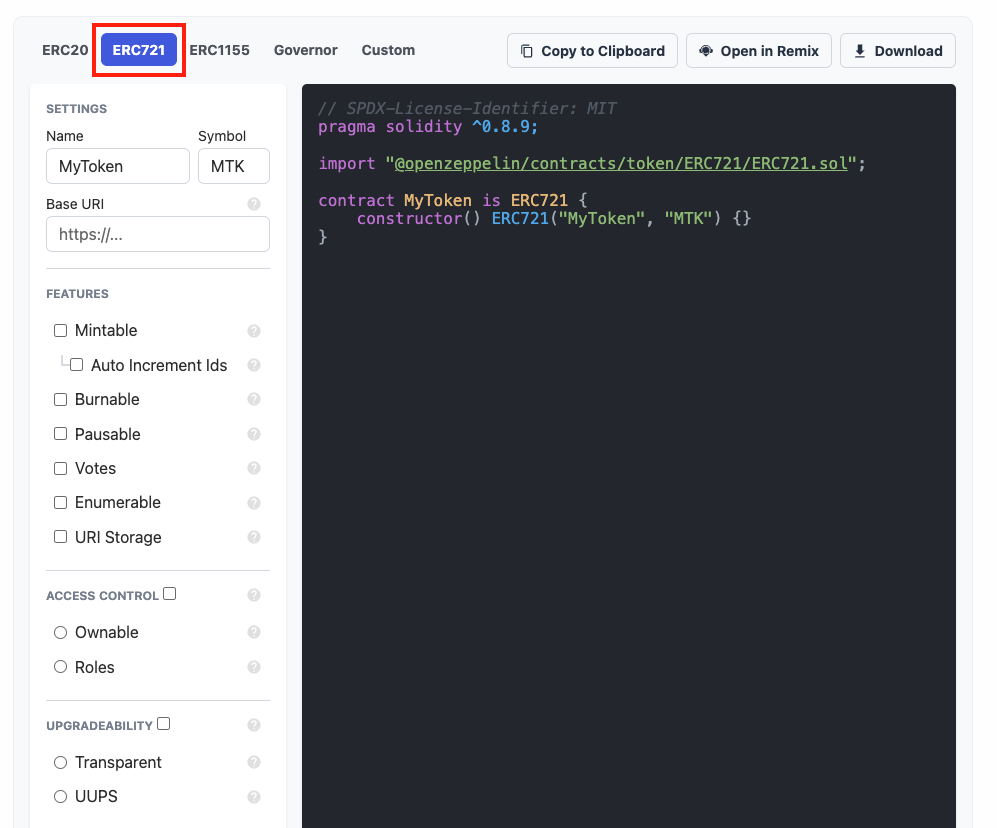
On the top left corner, select ERC721 for the type of ERC standard and the type of contract you wish to write:
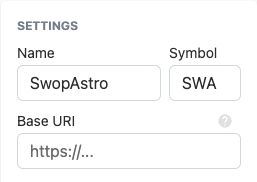
First, choose the name and symbol for your token. Put a name for your token in the text box with "MyToken", do the same with the symbol, and leave the base URI blank.
Selecting NFT (ERC721) Token Features
Once you have configured the settings for your smart contract, it's time to choose the desired features to integrate. In the features section, you have a variety of modules available that can enhance the functionality of your smart contract.
For this specific smart contract, we recommend selecting the following features:
- Mintable: By enabling this feature, a "mint" function will be created, allowing only privileged accounts to call it. This feature grants authorized individuals the ability to create new NFTs.
- Autoincrement IDs: With this feature enabled, the smart contract will automatically assign incremental IDs to each newly created NFT. This ensures that every NFT has a unique identifier.
- Enumerable: Including the Enumerable feature provides on-chain token enumeration. This feature allows you to retrieve information about the total supply of tokens and offers additional functions beyond the default ERC721 implementation.
- URI Storage: By selecting URI Storage, you can associate URIs (Uniform Resource Identifiers) with your NFTs. These URIs can be utilized to link metadata, images, or other relevant information to each NFT.
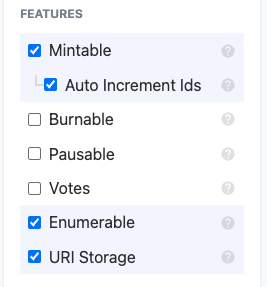
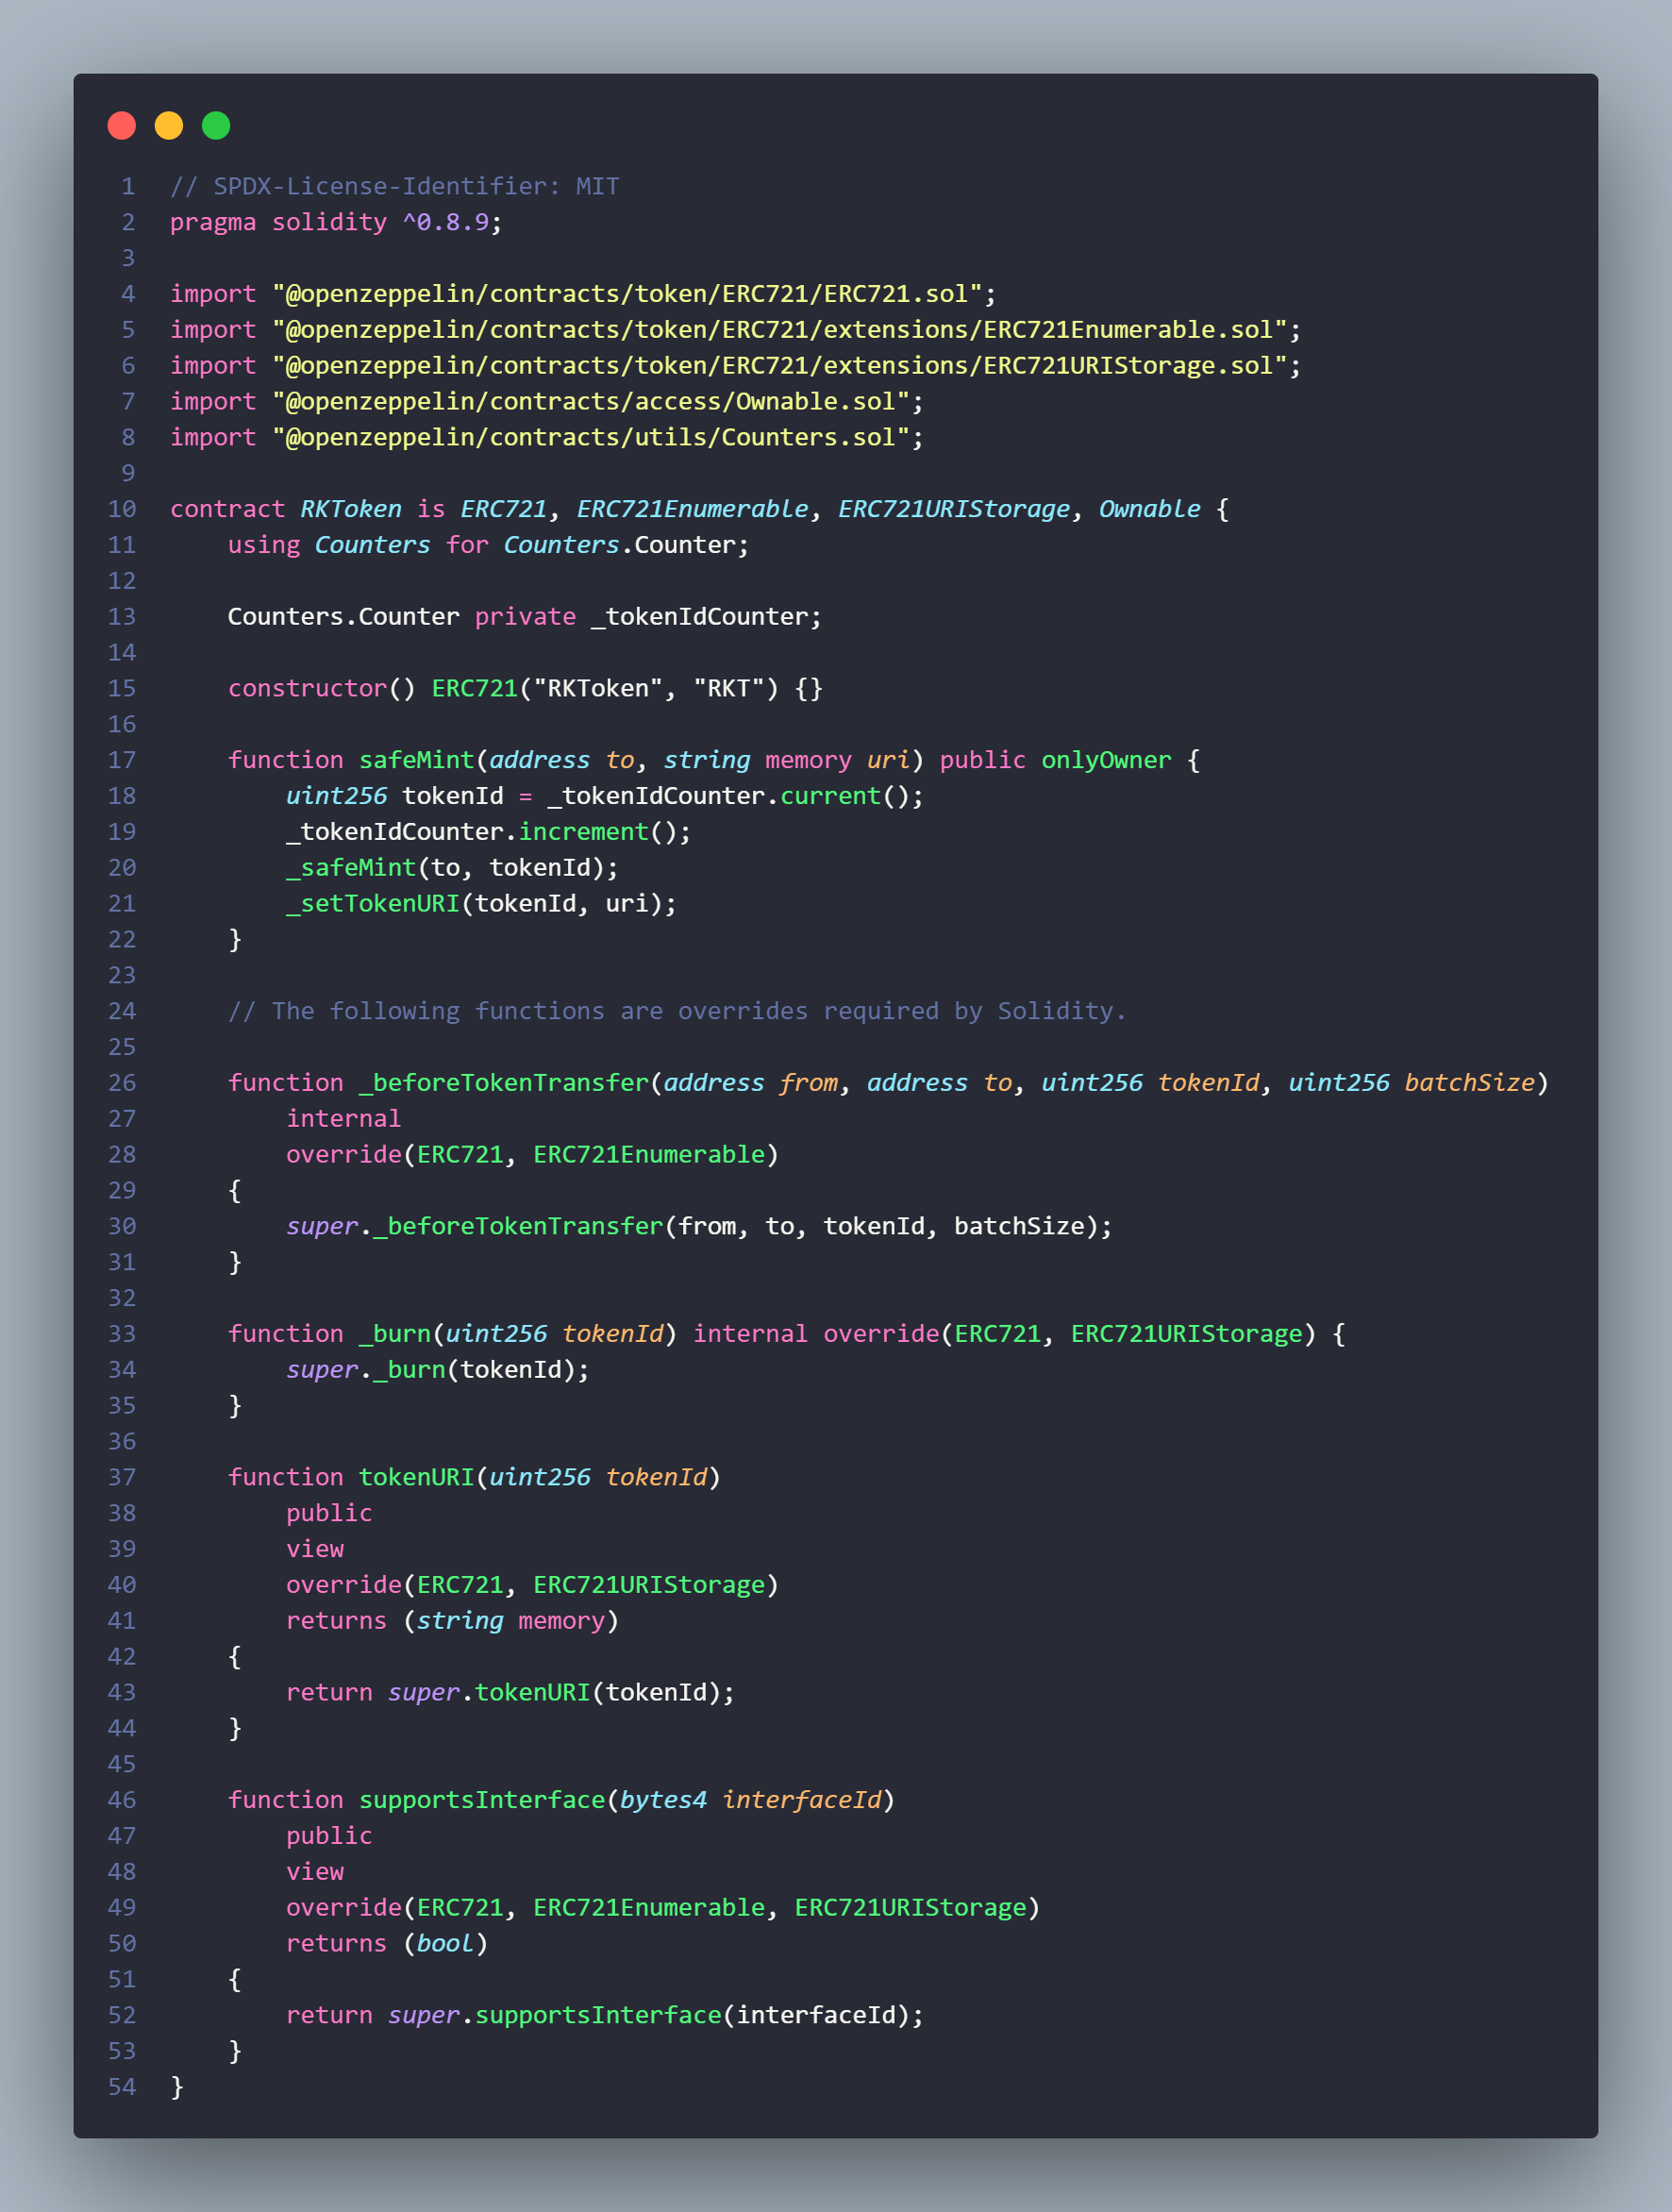
When you select the features you want, OpenZeppelin Wizard populates the Smart Contract code as follows:
Step 2: Creating and Uploading Metadata on IPFS
After developing your ERC-721 smart contract, the next step is to generate and upload metadata for your NFTs. IPFS (InterPlanetary File System) serves as a widely used decentralized storage solution that enables you to store and distribute files within a distributed network. By leveraging IPFS, you can securely store your NFT metadata and ensure its availability to users across the network.
Metadata structure
OpenSea supports metadata that is structured according to the official ERC721 metadata standard or the Enjin Metadata suggestions.
Here's an example of metadata for one of the OpenSea creatures:
{
  "description": "Friendly OpenSea Creature that enjoys long swims in the ocean.",
  "external_url": "https://openseacreatures.io/3",
  "image": "https://storage.googleapis.com/opensea-prod.appspot.com/puffs/3.png",
  "name": "Dave Starbelly",
  "attributes": [ ... ]
}
Here's how each of these properties work:
| | | | --- | --- | | image | This is the URL to the image of the item. Can be just about any type of image (including SVGs, which will be cached into PNGs by OpenSea), and can be https://github.com/ipfs/is-ipfs URLs or paths. We recommend using a 350 x 350 image. | | image_data | Raw SVG image data, if you want to generate images on the fly (not recommended). Only use this if you're not including the image parameter. | | external_url | This is the URL that will appear below the asset's image on OpenSea and will allow users to leave OpenSea and view the item on your site. | | description | A human-readable description of the item. Markdown is supported. | | name | Name of the item. | | attributes | These are the attributes for the item, which will show up on the OpenSea page for the item. (see below) | | background_color | The background color of the item on OpenSea. Must be a six-character hexadecimal without a pre-pended #. | | animation_url | A URL to a multi-media attachment for the item. The file extensions GLTF, GLB, WEBM, MP4, M4V, OGV, and OGG are supported, along with the audio-only extensions MP3, WAV, and OGA.Animation_url also supports HTML pages, allowing you to build rich experiences and interactive NFTs using JavaScript canvas, WebGL, and more. Scripts and relative paths within the HTML page are now supported. However, access to browser extensions is not supported. | | youtube_url | A URL to a YouTube video. |
The maximum file size for media supported is 100MB, but we recommend keeping it under 100MB for faster load times.
Upload Metadata
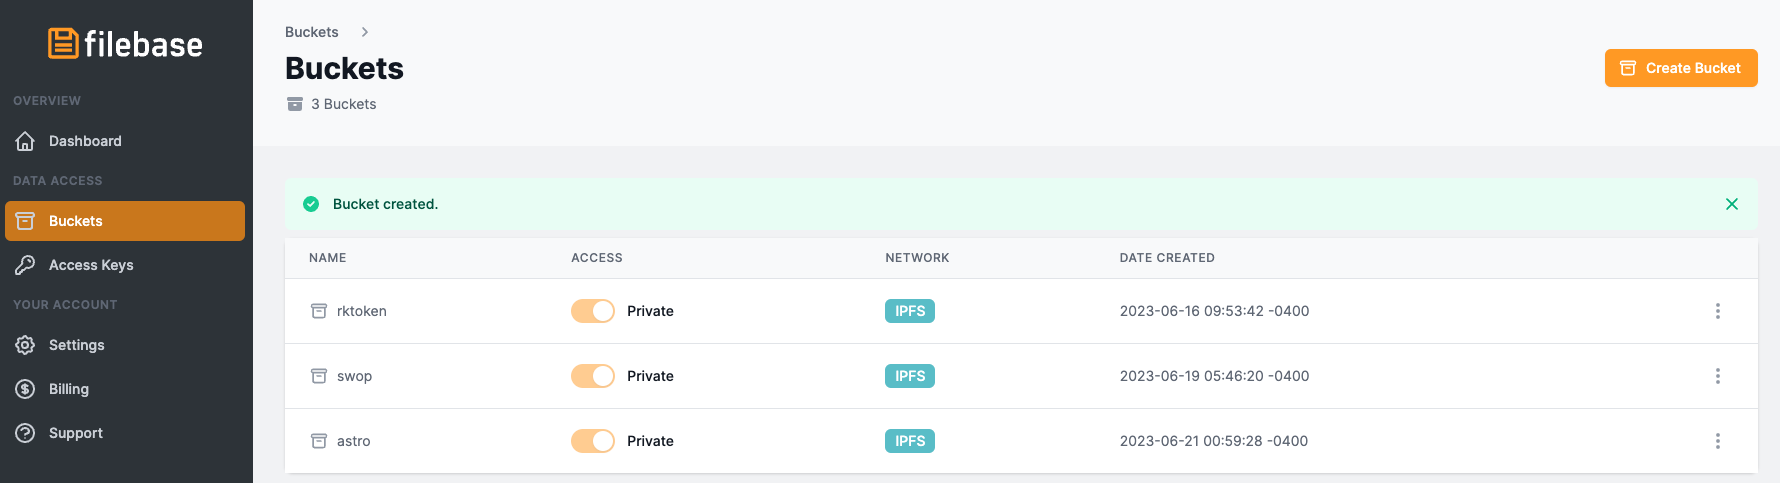
First of all, navigate to Filebase and create a new account.
Once logged in, click on the bucket button on the left-hand side menu, and create a new bucket:
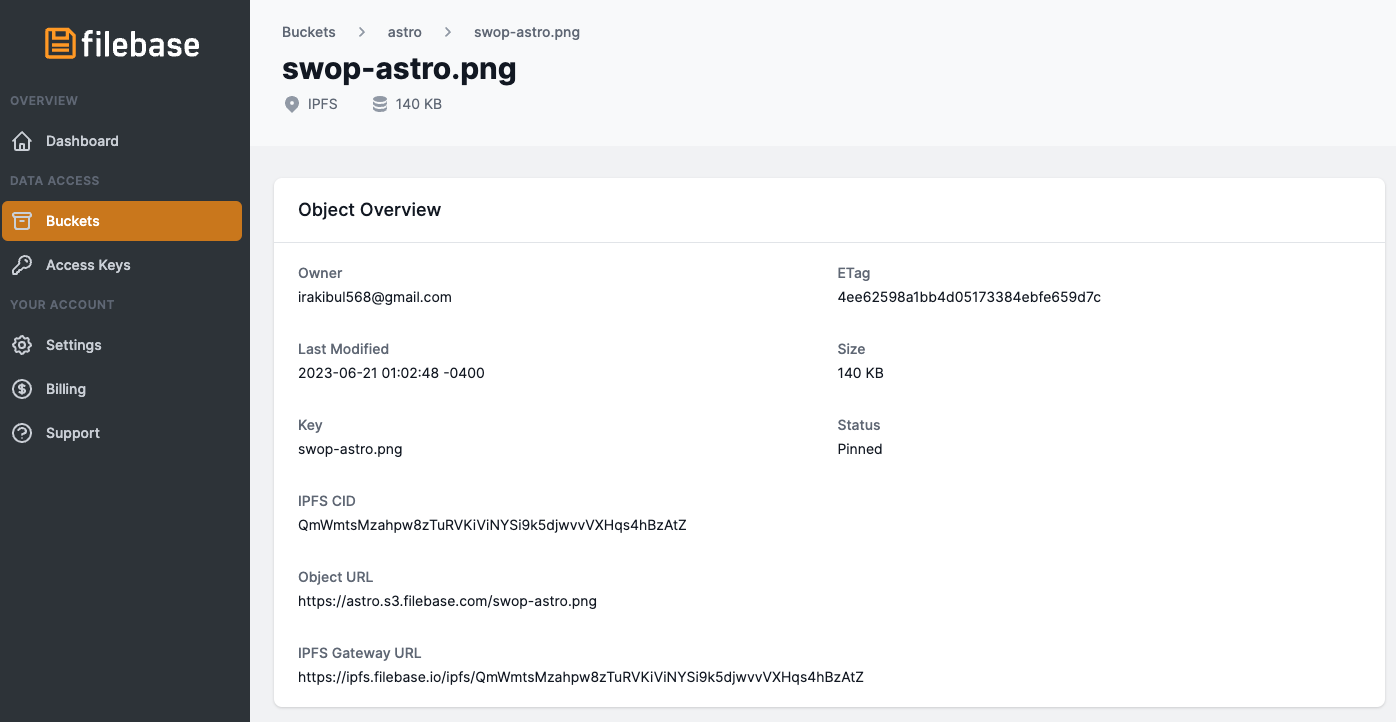
Navigate into the bucket, click on the upload button, and upload the image you want to use for your NFT.

Once uploaded click on it and copy the IPFS Gateway URL:
Using any text editor, paste the following JSON code:
{
  "description": "This is an Astro NFT of Swop. Swop is a non-custodial wallet that allows users to manage tokens in a trustless manner.",
  "external_url": "swopme.co",
  "image": "https://ipfs.filebase.io/ipfs/QmZdY45tn6taTDW8L5ARzWoRk8ScJHeVagqg45hCVovRLn",
  "name": "Swop Astro NFT",
  "attributes": [
    {
      "trait_type": "Base",
      "value": "Starfish"
    },
    {
      "trait_type": "Eyes",
      "value": "Big"
    },
    {
      "trait_type": "Mouth",
      "value": "Surprised"
    },
    {
      "trait_type": "Level",
      "value": 5
    },
    {
      "trait_type": "Stamina",
      "value": 1.4
    },
    {
      "trait_type": "Personality",
      "value": "Sad"
    },
    {
      "display_type": "boost_number",
      "trait_type": "Aqua Power",
      "value": 40
    },
    {
      "display_type": "boost_percentage",
      "trait_type": "Stamina Increase",
      "value": 10
    },
    {
      "display_type": "number",
      "trait_type": "Generation",
      "value": 2
    }]
  }
And save the file as "metadata.json". Move back to Filebase and upload the metadata.json file in the same bucket where we uploaded the Image.

Lastly, click on the CID and copy it, we’ll need it in the next part to build the token URI when minting out NFT

Step 3. Connect to the Polygon Mainnet blockchain network with Alchemy
To interact with the Polygon chain, there are various methods available. For the sake of simplicity, we will utilize a free account on Alchemy, a blockchain developer platform and API that enables communication with the Polygon network without the need to run our own nodes.
If you don't have an Alchemy developer account yet, you can easily sign up for a free account by visiting this link.
Once you've successfully created an Alchemy account, you can generate an API key by creating an app. This API key will grant you access to a Polygon Mainnet node via Alchemy.
To create an app and obtain your API key, follow these steps:
- Hover over the "Apps" option in the navigation bar of your Alchemy Dashboard.
- Click on "Create App" to access the "Create App" page.

- Name your app “Polygon Smart Contract”, offer a short description, and select “Polygon” for the chain, and "Polygon Mainnet" for the network.
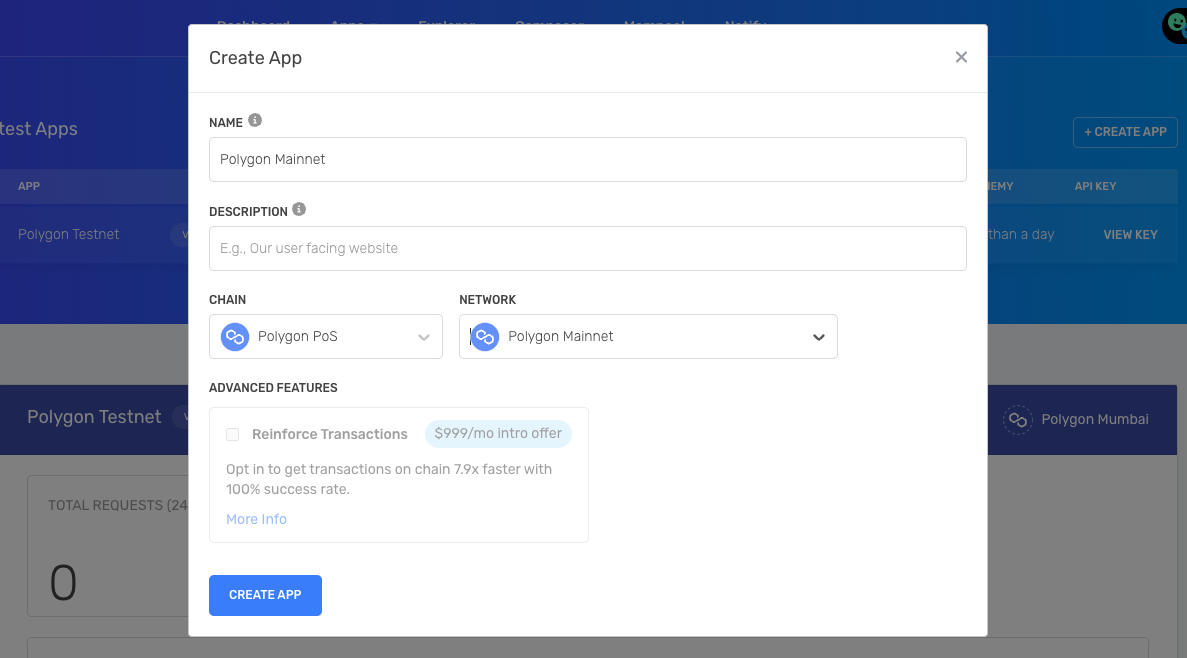
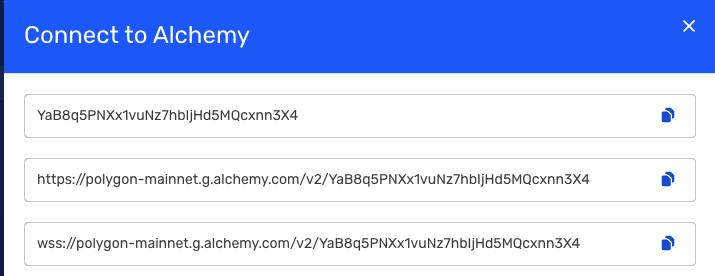
- After creating your app, click on your app’s View Key button in the dashboard and save the HTTP key. You will use this later in the tutorial.
Step 4. Create an Ethereum account with MetaMask!
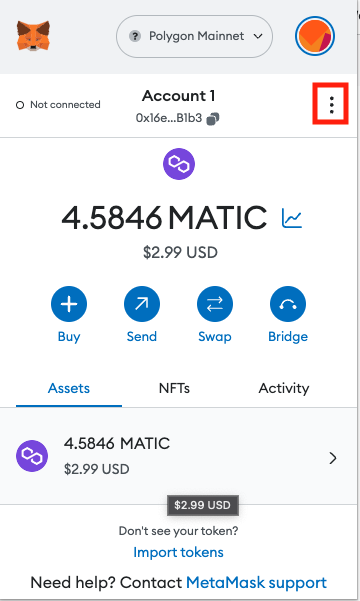
To send and receive transactions on the Ethereum network, you will need an Ethereum account. One convenient option is to use MetaMask, a browser extension that serves as a virtual wallet and allows you to manage your Ethereum account address.
Step 5. Get the private key from MetaMask
To obtain the private key from MetaMask, please follow these steps:
- Click on the options button.
- Select "Account Details" to access the account details.
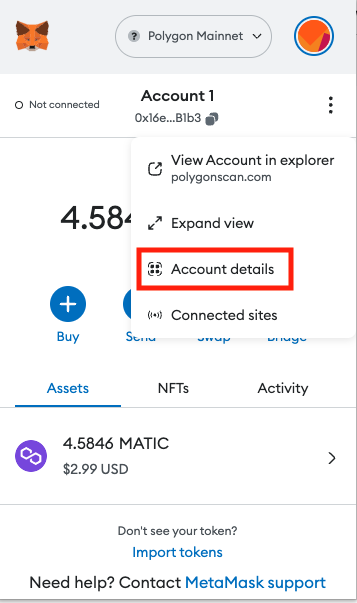
- Now, you will find the private key displayed. Please note that the private key is sensitive information and should be handled with caution.
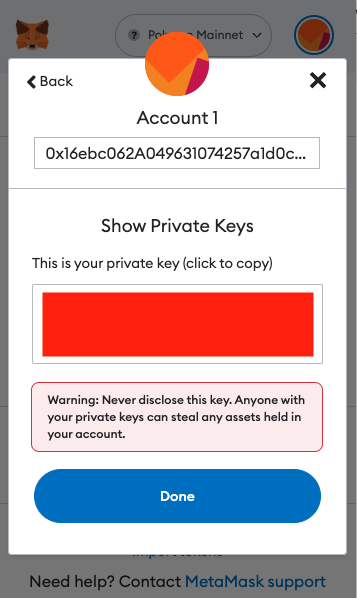
Copy and securely save your private key in a safe location. It will be required in the next part of the process for deploying the contract and minting NFTs. In the example provided, the private key is hidden in red for security purposes.
Step 6. Initialize your NFT Project
To initialize your Polygon NFT project, create a new folder by navigating to your command line and typing the following commands:
First, create a folder and navigate to your command line and type:
mkdir my-nft
cd my-nft
Now use npm init --yes to initialize the project.
npm init --yes
You should see something like the following output based on your newly created project configuration package.json:
package.json
{
  "name": "my-nft",
  "version": "1.0.0",
  "description": "",
  "main": "index.js",
  "scripts": {
    "test": "echo \"Error: no test specified\" && exit 1"
  },
  "keywords": [],
  "author": "",
  "license": "ISC"
}
Step 7. Download Hardhat
Hardhat is a development environment to compile, deploy, test, and debug your EVM-based smart contracts. It helps developers when building smart contracts and blockchain applications locally before deploying to a live chain.
Inside your my-nft project run:
npm install --save-dev hardhat
Step 8. Create a Hardhat Project
To set up Hardhat, run the following commands in your terminal:
npx hardhat
You should then see a welcome message and options on what you can do. Select Create a JavaScript project:
888    888                      888 888               888
888    888                      888 888               888
888    888                      888 888               888
8888888888  8888b.  888d888 .d88888 88888b.   8888b.  888888
888    888     "88b 888P"  d88" 888 888 "88b     "88b 888
888    888 .d888888 888    888  888 888  888 .d888888 888
888    888 888  888 888    Y88b 888 888  888 888  888 Y88b.
888    888 "Y888888 888     "Y88888 888  888 "Y888888  "Y888

Welcome to Hardhat v2.15.0

? What do you want to do? ...
> Create a JavaScript project
  Create a TypeScript project
  Create an empty hardhat.config.js
  Quit
Agree to all the defaults
√ What do you want to do? · Create a JavaScript project
√ Hardhat project root: · C:\Users\rakib\Desktop\my-nft
√ Do you want to add a .gitignore? (Y/n) · y
√ Help us improve Hardhat with anonymous crash reports & basic usage data? (Y/n) · y
Hardhat will then generate a hardhat.config.js file along with a couple of folders with sample code, including contracts, scripts, and test.
To install OpenZeppelin, run the following commands in your terminal:
npm install @openzeppelin/contracts
To check if everything works properly, run:
npx hardhat test
Now development environment is successfully configured.
Step 9. Create your contract
In the contracts folder, you can see Lock.sol example smart contract.
Create a new file called MyNFT.sol in the contracts folder. Add the following code to this file:
// SPDX-License-Identifier: UNLICENSED
pragma solidity ^0.8.18;

import "@openzeppelin/contracts/token/ERC721/ERC721.sol";
import "@openzeppelin/contracts/utils/Counters.sol";
import "@openzeppelin/contracts/access/Ownable.sol";
import "@openzeppelin/contracts/token/ERC721/extensions/ERC721Enumerable.sol";
import "@openzeppelin/contracts/token/ERC721/extensions/ERC721URIStorage.sol";

contract SwopAstro is ERC721, ERC721Enumerable, ERC721URIStorage, Ownable {
    using Counters for Counters.Counter;

    Counters.Counter private _tokenIdCounter;
    uint256 MAX_SUPPLY = 100;

    constructor() ERC721("SwopAstro", "SWA") {}

    function safeMint(address to, string memory uri) public onlyOwner {
        require(
            _tokenIdCounter.current() <= MAX_SUPPLY,
            "I'm sorry we reached the cap"
        );
        uint256 tokenId = _tokenIdCounter.current();
        _tokenIdCounter.increment();
        _safeMint(to, tokenId);
        _setTokenURI(tokenId, uri);
    }

    // The following functions are overrides required by Solidity.

    function _beforeTokenTransfer(
        address from,
        address to,
        uint256 tokenId,
        uint256 batchSize
    ) internal override(ERC721, ERC721Enumerable) {
        super._beforeTokenTransfer(from, to, tokenId, batchSize);
    }

    function _burn(
        uint256 tokenId
    ) internal override(ERC721, ERC721URIStorage) {
        super._burn(tokenId);
    }

    function tokenURI(
        uint256 tokenId
    ) public view override(ERC721, ERC721URIStorage) returns (string memory) {
        return super.tokenURI(tokenId);
    }

    function supportsInterface(
        bytes4 interfaceId
    )
        public
        view
        override(ERC721, ERC721Enumerable, ERC721URIStorage)
        returns (bool)
    {
        return super.supportsInterface(interfaceId);
    }
}
Step 10. Connect MetaMask and Alchemy to your project
To establish the connection between your MetaMask wallet, Alchemy account, and smart contract, you can utilize an environment file to securely store your private key and Alchemy API key. This allows your program to access the necessary permissions for sending transactions.
Follow these steps to set up the environment file using the dotenv package:
- Start by installing the
dotenvpackage in your project directory using the following command:
npm install dotenv --save
- Create a file named
.envin the root directory of your project. - In the
.envfile, add your MetaMask private key and HTTP Alchemy API URL. Retrieve the Alchemy API URL from the end of Step 3, and follow Step 5 to obtain and export your private key.
Your .env file should resemble the following:
API_URL=https://polygon-mainnet.g.alchemy.com/v2/<your-api-key>
PRIVATE_KEY="your-metamask-private-key"
We'll use the dotenv module inside our hardhat.config.js file to do so.
Step 11. Update hardhat.config.js
Update your hardhat.config.js with the following code snippet:
require('dotenv').config();
require('@nomiclabs/hardhat-waffle');
const { API_URL, PRIVATE_KEY } = process.env;
/** @type import('hardhat/config').HardhatUserConfig */
module.exports = {
  solidity: '0.8.18',
  defaultNetwork: 'polygon',
  networks: {
    hardhat: {},
    polygon: {
      url: API_URL,
      accounts: [`0x${PRIVATE_KEY}`],
    },
  },
};
Inside the hardhat config, define a new network called polygon that uses the Alchemy HTTP URL and your MetaMask account to talk to the blockchain.
Step 12. Compile our Polygon smart contract
To make sure everything is working so far, let’s compile our contract. The compile task is one of the built-in hardhat tasks.
From the command line run:
npx hardhat compile
This command triggers the compilation process for your smart contract using Hardhat. It will generate the compiled artifacts and store them in the designated output directory specified in your hardhat.config.js file.
By running this command, you can verify if your contract compiles successfully and ensure that everything is set up correctly so far in your project.
Step 13. Write the deployment script
Now that your contract is written and your configuration file is good to go, it’s time to write the contract deploy script.
Navigate to the scripts/ folder and replace the contents in the file deploy.js with the following:
require('dotenv').config();
const hre = require('hardhat');

const { ethers } = hre;
async function main() {
  const MyNFT = await hre.ethers.getContractFactory('SwopAstro');

  const gasPrice = ethers.utils.parseUnits('150', 'gwei');
  const myNFT = await MyNFT.deploy({ gasPrice });
  await myNFT.deployed();
  console.log('Contract deployed to address:', myNFT.address);
}

// We recommend this pattern to be able to use async/await everywhere
// and properly handle errors.
main().catch((error) => {
  console.error(error);
  process.exitCode = 1;
});
Step 14. Deploy the smart contract on Polygon
We’re finally ready to deploy our smart contract! Navigate to the command line and run:
npx hardhat run scripts/deploy.js --network polygon
After the deployment process completes, you will see a message similar to the following:
Contract deployed to address: 0x59E5A555507c5629C3e280e23938FE29F8e00063
Congrats! You just deployed a smart contract to the Polygon sidechain 🎉
📘NOTE
To successfully deploy the smart contract on the Polygon network, you need to ensure that you have at least 1 Matic token in your wallet. This is required to cover the gas fees associated with the deployment process.
Gas fees are paid in the native token of the network, which is Matic on Polygon.
If the gas price used for your transaction is too low, it may result in the transaction being declined with an error message like { "code": -32000, "message": "transaction underpriced" }. This occurs when the gas price you set is lower than the minimum threshold accepted by the network at that time.
It's important to monitor the current gas prices on the Polygon network, which can be checked on the Polygon Gas Tracker. This will help you determine an appropriate gas price to set for your transaction, ensuring that it is accepted and processed in a timely manner.
💡 To avoid the "transaction underpriced" error, you can increase the gas price in your deployment script or transaction settings to a level that is more likely to be accepted by the network. This allows your transaction to proceed without being declined due to low gas fees.
Copy your contract address (i.e. 0x59E5A555507c5629C3e280e23938FE29F8e00063) and in the .env file
Step 15. Create mint-nft.js to interact with the Polygon smart contract
Before you run the greeting interaction script, we also need to add TOKEN_URI environment variables. Remember the metadata.json you uploaded to Filebase in Step 2? Get the CID of metadata and add to the .env file like this:
API_URL=https://polygon-mainnet.g.alchemy.com/v2/<your-api-key>
PRIVATE_KEY="your-wallet-private-key"
CONTRACT_ADDRESS="your-contract-address-deployed-to-polygon-mainnet"
TOKEN_URI="ipfs://\<your\_metadata\_cid>"
In your scripts folder, creates a file called scripts/mint-nft.js.
Now add the following piece of code to mint-nft.js to call the mintNFT function:
require("dotenv").config();
const hre = require("hardhat");
const ContractJson = require("../artifacts/contracts/SPToken.sol/SwopAstro.json");

// Get contract ABI and address
const abi = ContractJson.abi;
const contractAddress = process.env.CONTRACT_ADDRESS;

// Get the NFT Metadata IPFS URL
const tokenURI = process.env.TOKEN_URI;

async function mintNFT() {
  const [deployer] = await hre.ethers.getSigners();

  // Create a contract instance
  const contract = new hre.ethers.Contract(contractAddress, abi, deployer);

  const gasPrice = hre.ethers.utils.parseUnits("150", "gwei");

  const nftTxn = await contract.safeMint(deployer.address, tokenURI, {
    gasPrice,
  });
  await nftTxn.wait();
  console.log(
    `NFT Minted! Check it out at: https://polygonscan.com/tx/${nftTxn.hash}`
  );
}

mintNFT()
  .then(() => process.exit(0))
  .catch((error) => {
    console.error(error);
    process.exit(1);
  });
And now we're ready to run the script:
npx hardhat run scripts/mint-nft.js
You should get an output that looks something like this:
NFT Minted! Check it out at: https://polygonscan.com/tx/0xb8f5227ca7e8310cacdf88597545c6cab23c8306d36539a5c117c7230560e310
You can check out your NFT mint on Etherscan by following the URL above.
You can view your NFT on OpenSea by searching for your contract address. Check out our NFT here.

